12.18 in Boat Plans, continues, sanding
A little bit each night. Thats my tactic for dealing with the sanding phase of building a Passagemaker dinghy. Well, not so much a tactic, really, but a consequence of some other things going on right now. So at least I am making progress. The interior has been given a going over with 120-grit paper, but some rough spots remain, a result of some inattentiveness while applying the final overall coats of epoxy. Those drips take a long time to sand down. But at least the bronze screws holding the bottom skeg and skids are nice and bright now! The sanding is indeed tedious, but at least in a couple areas where I started the 220-grit sanding, the result is very satisfactory. There wont be too much more to blog about as the sanding continues. But in the meantime, check out these sanding songs. CLC completed a recent month-long contest to write a "sanding song" and recently announced the winners. Total hours 75.25.
Also, I finally tackled a problem I had been putting off. Earlier, I had installed a trailer hitch on our Saturn VUE. But for months I had been avoiding finishing the job by installing the wiring harness. The main stumbling block was running a dedicated wire from the vehicles battery to the harness switcher in the rear of the vehicle. One cannot simply splice the trailer wires into the VUE taillight wires because there is insufficient current in that circuit to drive both taillights and trailer lights. Instead, a logic switcher is spliced in, and is connected to its own power supply. I puzzled over several routes to run the power cable from the battery, through the firewall, under plastic panels, and to the compartment in the rear of the vehicle where everything is connected. I finally did it this morning, and after some fumbling with a rubber grommet in the firewall, I got the power wire in place. A clean installation, all ready to splice in the controller and the trailer harness plug.
Read more
 After tending to some much needed -- and long overdue-- yard work and landscaping for the past couple days, I was able to return to boatbuilding for a short time this evening. Indeed, there seems to be at last some light at the end of the tunnel. Some small building tasks remain, such as assembly of the rudder, and some rigging. But the main task ahead now is finishing the hull. Even here, odds and ends remain. The rub rails and skeg are needing to be epoxy coated, as well as some bare edges of wood, such as the upper daggerboard trunk slot and newly routered edges of the transom knees. But the tedious job of sanding is the one main obstacle between me and sailing. So tonight I began the journey. The belt sander is too brute a force for this job, so the smaller and slower quarter-sheet orbital sander will be the tool that will get the most use. There is plenty of tight spots that will require sanding by hand, also. The entire hull needs going over with 120-grit, and then 220-grit paper. I understand some builders go even finer before applying the paint or varnish. But I already understand I have accumulated too many small building flaws to ever achieve a contest-winning, show boat appearance. I am more realistically hoping to arrive at a respectable looking boat that will be durable, a true sailer, and decent looking. The journey begins... Total hours 73.75.
 The bulkheads and seat parts got a good sanding with 120-grit paper, and then a second coat of epoxy. The long list of tasks to complete before I can start assembling, or stitching, the hull is finally starting to dwindle down. Unusually cold temperatures have persisted in central Alabama, so I put a radiator style space heater in the garage in an effort to speed the epoxy curing. The epoxy itself isnt volatile, and the heater is away from any clutter, so I think it will be safe. Ill keep a close eye on it, just to be sure. The experiment here is to see if a 1500-watt heater has enough power to change the temperature in a fairly large two car garage. Total hours 14.75.
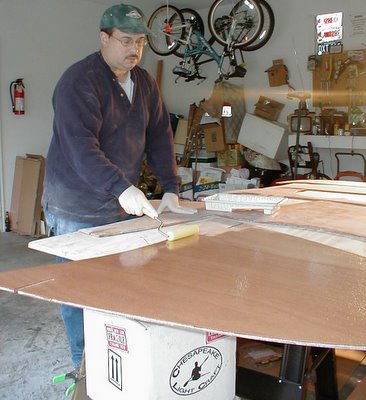
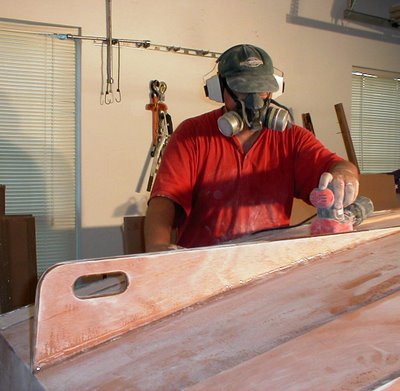
 Today began the process of finish sanding the strakes before they are stitched into the hull. They were sanded with 100-grit, then 220-grit sandpaper. This took a little lighter touch, so instead of the belt sander, an orbital quarter sheet palm sander was the tool for the job. After reading comments from other builders, I wasnt surprised at how quickly I went through the sandpaper. A quarter sheet of 100-grit wouldnt quite do both sides of a whole strake before it lost the power to "cut" well. Even clearing the clogged paper with a wire brush didnt extend the life appreciably. Luckily I had enough sandpaper on hand today to do as much work as I had time for. But Ill have to buy some more on the way home tomorrow. Finally, I really must say I like my little Black and Decker sander. It might not be heavy-duty enough for the pros, but if it holds up for this project, Ill be happy. The gel pad handgrip really cuts down on vibrations transmitted to the hand. And the dust trap seems to do a decent job, without requiring me to connect a vacuum hose. It also comes with a clever press-in jig to punch holes in new sandpaper squares so the dust collection works. Total hours 17.25.
 An afternoon thunderstorm brought a bit of much needed rain to central Alabama, while also cooling the temperature from the upper 90s to the mid 70s. It was these conditions that I had for the sanding of the primer coat on the exterior hull. I was only a few minutes into the process of sanding with 120-grit paper when I found the conditions were less than ideal. The high humidity caused the primer to clog the paper fairly quickly. This is due to the titanium dioxide in the primer, which absorbs the moisture from the air and becomes gummy. The optimal technique is to prime and get the first paint coat on the boat in dry weather. Unfortunately, low-humidity days are few and far between in the deep South this time of year, even during a drought. So I pressed on, hoping for the best. The surface is fairly smooth, and was then wiped down and cleaned. All is ready for the first coat of true paint. Total hours 87.00.
 And so, it was on a warm but unseasonably comfortable June evening that I completed the sanding of the boat. Tonight it was a fairly quick task to go over those spots where I added one more coat of epoxy, to fair them in with the rest of the sanded hull. As mentioned before, its not perfect, but good enough. I even wiped down large portions of the hull with a soaking wet rag to remove the large amounts of dust. What was underneath was a suitably smooth hull, ready for painting and varnishing. With a holiday weekend of sorts ahead, I have ambitious plans to completely wash and clean the hull, and mask off the bottom which will receive first a coat of primer, then a couple of coats of gloss white paint. Total hours 85.50.
 The biggest part of the building project, in terms of effort and time, is "finishing". Sanding, painting, and varnishing will be the most tedious part of the job, and it began today. With the first side of the epoxied strakes sufficiently cured, I started sanding them in preparation for a second coat. However, I was only about 45 minutes into the job when my bargain-basement sander quit working. Whether it is gone for good, or just overheated remains to be seen. But its my own fault, I suppose, in trying to get by with cheap tools. I just thought that even the cheap ones would last longer than 45 minutes. Total hours 6.75.

