Tampilkan postingan dengan label second. Tampilkan semua postingan

Sabtu, 16 April 2016

Second coat

0


After all that sanding yesterday, I spent a good deal of time cleaning up my "shop". After sweeping, vacuuming, and wiping down the strakes, they got a second coat of epoxy. It was today that I noticed a couple of spots where I had sanded through the first coat down to the wood. Mostly it was at the one lousy scarf joint, where there was a high spot. But there were a couple of other little nicks where I wasnt paying complete attention with the sander. I tried to lay the second coat on a little heavier in these spots to make up the difference. But I will probably turn to the CLC boat builders forum to ask what I need to do in this case. Should I apply a third coat? A spot second coat in these areas? Nothing, and leave it to the varnish or paint to give supplemental waterproof-ness? Local temps are in the upper 60s, and so I can give the flip sides their second coat tomorrow. The second coat goes on much faster, and requires less epoxy than the first coat. Also, the roller bubbles settle out on their own and dont require tipping in now that the wood is sealed. Total hours 8.75.

Read more

Minggu, 10 April 2016

Sanding and second coat

0

The bulkheads and seat parts got a good sanding with 120-grit paper, and then a second coat of epoxy. The long list of tasks to complete before I can start assembling, or stitching, the hull is finally starting to dwindle down. Unusually cold temperatures have persisted in central Alabama, so I put a radiator style space heater in the garage in an effort to speed the epoxy curing. The epoxy itself isnt volatile, and the heater is away from any clutter, so I think it will be safe. Ill keep a close eye on it, just to be sure. The experiment here is to see if a 1500-watt heater has enough power to change the temperature in a fairly large two car garage. Total hours 14.75.


Read more

Kamis, 07 April 2016

Second paint coat

0


The exterior hull went through another sanding and painting cycle last evening and early this morning. Last evening, I moved it out and sanded it lightly after the first coat of Interlux Brightside white. There was one drip, a few specks of dust or larger debris, and a couple of hairs (from me or the resident cat, I cant be sure). I started sanding with 220-grit paper on my orbital sander, but found this left an undesirable brownish tinge to the paint that was the same color as the grit in the paper. For whatever reason, the same paper left no mark if I sanded by hand using a sanding block. So this is what I did in the humid evening air. After that workout, I wiped down the dust from the hull and moved it back into the shop, then masked the edges again with tape and newspaper as previously. I didnt paint in the evening, since the garage door needs to be open for ventilation, but the lights would attract too many bugs in the evening twilight. So early this morning, the hull got its second coat of paint. The sharpness of the shine seemed to improve noticeably after the second coat.

Before applying the third coat of paint using the method above, I may do some varnishing of the interior. The main reason is that my assistant for moving the boat will be unavailable for the next week. But if I flip the hull over, I can put it on the trailer and move it out for sanding and in for varnishing single handedly. Total Hours 89.25.

Read more

Senin, 04 April 2016

Second bottom coat

0

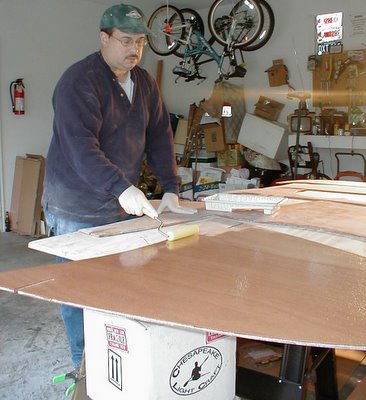
After an enjoyable weekend with guests from out of town, it was time to return to boatbuilding. Tonight the exterior got a second coat of epoxy. But before it was rolled on, some sanding was needed. Because the exterior #1 panels had previously been coated with their first coat, a bit of sanding was required to smooth out what may have been outgassing. Also, the bottom panel with its layer of fiberglass benefited from some sanding to knock off the tops of epoxy on the weave. This sanding reduced the amount of epoxy that would required to fill the weave. Total hours 63.75.

Read more

Selasa, 15 Maret 2016

Second interior coat

0

The interior of the hull got its second and final overall coat of epoxy. The lesson of tonight is that lighting is important. After the first coat, things looked good. Then while I was glassing and assembling the daggerboard trunk, I used the excess epoxy to give some crevices and joints a little extra coverage. With a foam brush, I really worked the joints, forcing epoxy into any gaps or voids I could find. I was satisfied with the effort, until the next morning when I opened the shop (garage) door. In the sunlight were some drips and runs that I hadnt seen, even under the glare of my 1000-watt worklights. The lighting just wasnt at the right angle. I was crestfallen the rest of the day, thinking about the flaws in what I had thought was a superb job. So tonight, a few deft touches with a belt sanded and 120-grit paper made quick work of the drips. Then I was off and running on the second coat. This one finally filled the weave of the bottom glass, and sealed the lapstrake joints once and for all.

Ill take a well earned day off tomorrow to celebrate the weeks end with my wife at our favorite pizza joint. Then this weekend comes the permanent installation of the bulkheads and daggerboard trunk/seat unit. Total Hours 54.50.

Read more

Jumat, 26 Februari 2016

The Swallow Scow Plans The Rudder Magazines Second DIY Scow

0

The Rudder magazine launched their second scow, the Swallow, a 24 foot, three person scow in December 1898, just three months after they started publishing the plans for the 16 foot Lark scow. A year later, in the November and December 1899 issues of the magazine, they would serialize the Swallow plans, and like the Lark, issue a stand-alone plans and building booklet  The design is credited to Charles Mower but the prototype builder, Larry Huntington, was a renowned scow designer in his own right. I cant imagine that Larry Huntington didnt have a large say in the design of this scow so I personally would credit the design to a collaboration, a Mower/Huntington design.

As with the Lark scow, the Swallow proved very popular with amateur builders and was built around the world. Unlike the Lark, the Swallow didnt make it wholly into todays sailing scene. In looking at all the modern day scow designs, it appears to me that only the Sea Island One-Design seems to have inherited a large portion of her DNA from the Swallow. (The Sea Island One-Design ended up wider, particularly at the back end.)

For those who wish to delve further, you are in luck; the Library of Congress has scanned the Swallow plans booklet into PDF format.


Click here for the Library of Congress PDF scan of The Rudder plans booklet of the Swallow scow.


The following photos were harvested from The Rudder Swallow plans booklet. As always click inside the photo for a larger view.

The cover of the booklet.


The lines. The very shallow arc bottom was also the shape of Larry Huntingtons Seawanhaka scow, Question, of 1895.


Two photos of the prototype on her maiden voyage in December 1898, The Rudder magazine editor Thomas Day skippering and Larry Huntington crewing. The day was cold and blustery.


Entering the harbor.


Group boatbuilding party planking the hull and flipping her rightside.


Compendium of launch and sailing photos.


Read more

 
Powered by Blogger